ACTIVE Jig and Press Setup Guide

Arbor-press-yellow-handle[1].png__PID:8a4c895d-59b3-462b-98cc-79c02c8fae21

Congrats on your new Eazy-Press solutions jig!  This will optimize your production tremendously!

contents.jpg__PID:1015ec5e-6fed-4587-8880-4e6be638ab71
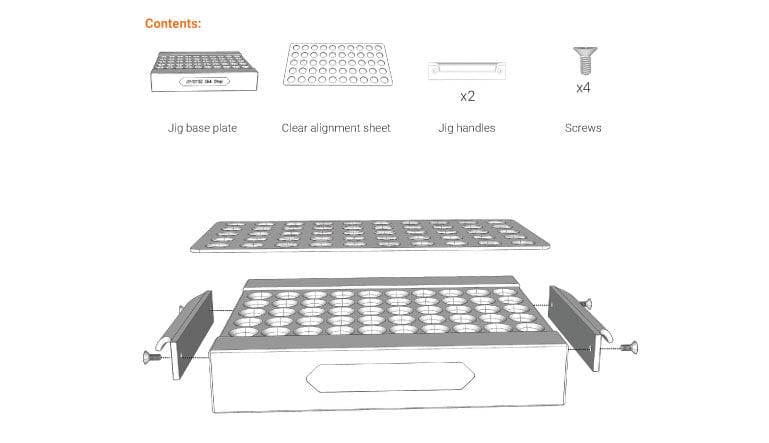
  • Remove all contents from jig box.
  • Unwrap handles and locate screws
  • Orient handles with the finger opening towards the bottom.
  • Screw handles onto the sides of the jig plate.  There are pre drilled holes on the plate that will guide the placement of the handles.

Filling

filling1.jpg__PID:422f3450-6844-46d2-a91d-c6365ab7a893
  • Place cartridges (B) in the jig (A) and press down to make sure they are all seated properly into the pockets.  If using different jigs for different products, make sure you have the correct jig.
  • Place the alignment sheet (C) onto the tops of the cartridges so that it is touching the top of the foam.  The sheet has a beveled. edge on one side of the holes.  Place the beveled edge side down for easiest alignment.
  • Place the jig with the cartridges and alignment sheet inside your automatic filling machine.
  • After filling, take the jig out of the filling machine and remove the clear alignment sheet (C). (Leave the cartridges in the jig.) If the sheet is not removed before capping, it will get stuck between the two pieces of foam.
filling2.jpg__PID:3c38382c-af04-4df5-8c57-0f871930f432

Capping

capping1.jpg__PID:7190bb24-1141-48b7-ac3b-394c119cc51e
  • Gently place the foam block with mouthpieces (D) on top of the cartridges.  Make sure that they align onto the center posts.
  • Refer to your press setup instructions for proper press setup.
  • If using AVD press, place the plastic press plate (E) that came with your press on top of mouthpieces
  • Activate your press to cap/seal the cartridges.
  • Remove the jig from your press.
  • You can easily remove the cartridges from the jig (A) by pulling the foam block (B) out as a unit.
capping2.jpg__PID:7e8ade76-7d2f-476f-90eb-2aa90482196b
press-diagram.jpg__PID:71ba0ba9-dfe2-4fee-b07a-2ef6252b0573

Press Setup

Please Note: 
The press is very heavy and comes in greased up so it does not rust in storage.  It just needs a little wipe down and it is good to go.  The jig is very user friendly.

setup-step1.jpg__PID:95cf0b57-48e7-4410-a4a6-65f63a004b15

Step 1

Unbox your new press.  Adjust the adjustment nuts higher to lift the press head away from the press base.

setup-step2.jpg__PID:e6fafed7-1d21-43f1-83d8-6a99b4bc95d9

Step 2

Wipe off your press using a dry towel.
NOTE:  Do not excessively remove the food grade grease on the bearings.  This lubrication is needed for proper function of the press

setup-step3.jpg__PID:cd85ffa4-67fa-4220-baba-92397b96fff9

Step 3

Place your press on the table so that the longer base portion is to the front.  Screw in the handle so that it is pointing away from you.

setup-step4.jpg__PID:b0732fac-bc2c-49d1-a822-6212d8e515e6

Step 4

Locate your cartridge jig/tray (A).  Place the cartridge 50 pack (B) inside the jig. Lightly place the mouthpieces (C) on top of the cartridges (B), making sure they align onto the center post. No not take the carts or mouthpieces out of the foam.

setup-step5.jpg__PID:829dd513-2825-4909-b5e3-298a687122f1

Step 5

Place the plastic press pad (D) on the top of the mouthpieces (C).

setup-step6.jpg__PID:73234be3-3e27-44fa-b83e-17bcb30b4fcd

Step 6

Adjust the press head (E) so you can place the cartridges, jig and press pad into the press. Adjust your press so that the press head is 1/4" away from the plastic pres pad (D).

setup-step7.jpg__PID:7b901316-6eac-4016-a8f6-d40d2f759fd7

Step 7

Make sure the press base (F) and press head (E) are level side to side and front to back so it presses all carts evenly.  Use a level tool to ensure this.

setup-step8.jpg__PID:096d0e18-7596-4ce6-89e9-e9e3a8e15798

Step 8

Tighten the nuts with the wrench provided (F). Hold the press head (E) while tightening the nuts to keep it from tilting.
NOTE: Make sure the adjustment nuts are tight at the beginning of every shift to avoid mis-capping.

setup-step9.jpg__PID:dba08a7f-d17b-4f49-9539-28113942a70d

Step 9

Tighten the nuts with the wrench (F). Hold the press head (E) while tightening the nuts to keep it from tilting.
NOTE: Make sure the adjustment nuts are tight at the beginning of every shift to avoid mis-capping.

setup-step10.jpg__PID:546118f7-dcc8-44f9-88e5-7aaa2f34c181

Step 10

To cap, pull down on the lever fully until you hear, see and feel the mouthpieces seating into place.  If you do not hear a strong click noise, you may need to adjust the press head closer to the press pad.  Pressing again after rotating the jig 180 degrees can help.

setup-step11.jpg__PID:61d70d69-a287-4b6b-900b-4a50e65c526c

Step 11

You can easily remove the cartridges from the jig (A) by pulling the foam block (B) out as a unit.